
The original Sony PlayStation (PS1), also known as PSOne or PSX, was home to some of the most iconic games in history—Metal Gear Solid, Final Fantasy VII, Tekken 3, and many more.
While the console may be long gone, the magic of those classic titles can still be experienced today—right on your Android smartphone! Thanks to powerful emulators and modern mobile hardware, playing PS1 games on Android is surprisingly easy and smooth.
In this guide, we’ll walk you through everything you need: from choosing the best emulator and setting it up, to loading your favourite PS1 games and enjoying that nostalgic gaming experience on the go.
What's The Best PS1 Emulator For Android?

There are many PS1 emulators available for Android smartphones, such as ePSXe, FPse, RetroArch, DuckStation, and Lemuroid.
However, choosing the best PS1 emulator depends on personal preferences rather than a universal recommendation, as not all PS1 Android emulators are created equal.
For example, ePSXe offers multiplayer support and smooth gameplay; RetroArch provides excellent compatibility through its emulator core libraries; FPse is beginner-friendly; and DuckStation (another PSX emulator for android) is both free and smooth in performance.
Personally, I recommend DuckStation because it is completely free to use, unlike ePSXe and FPSe. So, if you're someone looking to relive your childhood memories by playing PS1 games on Android, DuckStation should be your first choice—it’s powerful enough to run nearly every PlayStation game ever developed.
So, let's move on to section below and see that how can we play PS1 games on any Android smartphone.
Requirements For Running Sony PS1 Games On Android
Before you can start playing your favourite PSOne games on your Android smartphone, you have to fulfil the requirements below.
- At least a mid-range Android smartphone or tablet.
- At least one Sony PlayStation PS1 game ROM ISO or .bin file.
- PS1 BIOS file SCPH1001.bin.
Disclaimer
We do not provide any download links for PS1 BIOS or PS1 games ROM files (PS1 games ISO), as doing so may violate copyright and digital intellectual property laws, which vary from country to country. Downloading or distributing BIOS files and game ROMs without proper ownership is typically considered illegal.
The best and most legal way to enjoy PS1 games is by creating ROM backups from the original PlayStation discs you own. Similarly, you should dump the BIOS file from your own PS1 console.
If you do not own the original discs or the PS1 BIOS file, we strongly advise checking your local laws before proceeding with any downloads.
Additionally, we do not recommend using websites that host ROM files for downloading. Many of these sites run malicious scripts or display deceptive ads that can compromise your device's security.
Visiting such sites may expose your PC or Android phone to malware, spyware, viruses, rootkits, keyloggers, trojans, or worms. So, take this seriously and if you still wish to proceed then it would be your call.
How To Play PlayStation PS1/PSX/PSOne Games On Android With DuckStation
At this point, we assume that you have met the requirements, read the disclaimer carefully, and are ready to proceed with the rest of the article. In this tutorial, we’ll be learning how to play Tekken 3 PS1 game on Android using DuckStation.
Tekken 3 is my all-time favourite PS1 game that I used to play a lot during my childhood. It is both one of the best PS1 games on Android and a musical masterpiece in gaming history. I was always fascinated by characters like Paul Phoenix, King II, Ogre, Yoshimitsu, Forest Law, and Hwoarang. Among them, Paul Phoenix and King II were my favourites — I had mastered their moves like a kung-fu grandmaster back in the day.
Even today, if someone challenges me to a Tekken 3 match, they wouldn't stand a chance — I still remember the combos and finishers of those two like the back of my hand!
Now, let’s get to the present and dive into how to play this legendary game on your Android phone — without wasting any more time.
- On your Android phone, create a folder named 'PS1' and transfer the PS1 BIOS SCPH1001.bin and the game ROM ISO or the .bin file to this folder.
- Download and install the DuckStation Android Emulator on your phone from Google Play store.
- Once installed, open the emulator app and tap 'Next' on the first screen that appears.

- Next page appears for 'Settings.' Tap 'Internal Resolution' and select 5x (for 1080p) and 3x (for 720p). Using this option will upscale the PS1 games graphics.

- Tap 'Aspect Ratio' on the same screen and select 'Auto (Match Display).'

- Now tap 'Emulation Screen Orientation' and select 'Sensor Based' and then tap 'Next' to move forward on to the next steps.

- In this step we will need to import the BIOS file (SCPH1001.bin) into the emulator. Tap the 'Import BIOS' option and locate the file from the 'PS1' folder on your phone's internal storage. You will get confirmation on the screen for successful BIOS import. Tap 'OK' to close it.


Note: If while importing the BIOS file, DuckStation asks for file access permission then you will need to grant the permissions. If you do not allow DuckStation to access your phone's internal storage then it will not work.
- After importing the BIOS file, tap 'Next' to select the 'Game Directories.' On the 'Game Directories' page tap the '+' plus button and it should automatically open your 'PS1' folder. You will see an option 'USE THIS FOLDER,' tap it to select the game directory.

- DuckStation will now ask for permission to access the files in the 'PS1' folder, tap 'Allow.' The game directory will now appear in DuckStation emulator. Tap 'Next' to proceed.

- In this step, an 'Achievements' page will open which will ask you to earn achievements and leaderboard tracking with a Retro Achievements account. If you do not wish to configure it, simply proceed and tap 'Next.'


- A 'Setup Complete' page will open and then you have to tap 'Finish.'


- Once you tap 'Finish,' you will be able to see the game on the screen under the 'All Games' options.

- Tap the game to start playing it on your Android phone.

Configuring Game Properties: Enable Game Patches (Cheat Codes)
With DuckStation it is possible to configure game patches (cheats). With game patches we can unlock game content without playing it for hours. For example the game patches for Tekken 3 allows us to unlock all the characters, the Tekken Ball mode, theatre mode, and super secret codes. Let's see how to configure game properties below.
- To configure game properties, long tap the game icon under 'All Games' and tap 'Game Properties.'

- Then on this page, swipe the options panel which starts from the 'Summary' option and tap 'Patch Codes.

- Make sure to enable 'Enable Codes' option and then scroll down to see cheat codes that you can enable. For Tekken 3, the first cheat code that you should enable is the 'Absolute Everything Unlocked.' This cheat code will unlock everything within the game and you do not have to play it for hours to unlock characters, hidden stages, and game modes. Also, I will enable one more cheat code 'No Black Bgs (For True Ogre Fights), this will disable the black background on True Ogre fights.

Note: Using multiple patch code cheats may crash the game. So, check whether the cheat works without crashing the game or not. If game crashes due to some cheats then it would be good to disable them.
Create Memory Cards To Save Game Data In DuckStation
It is crucial to create memory cards so that the game can save its data. Let's see how we can create memory cards in DuckStation.
- After configuring the patch codes, on the same page, swipe on the options panel further towards left to access 'Memory Cards.' Tap 'Create New Card,' enter a name for your memory card and then tap 'Create.'

- Creating memory cards is not mandatory as the emulator creates a default memory card. So, you do not have to create it separately. However, if you wish you can create one or skip this step altogether.


How to Configure The Touchscreen Gamepad on DuckStation
DuckStation emulator provides a default layout for the onscreen controller. You can use the touchscreen controller both in the portrait and the landscape mode. But some situations may arise when you may need to configure the controller layout, such as when playing the games on a tablet. So, let's learn to configure the gamepad in this section.
- Open the DuckStation emulator and run the game.
- When the game starts running, tap the 'Pause' button in the top right corner and then tap the controller/gamepad button just next to the 'Settings' icon.

- From the options on this page, tap 'Touchscreen' and you will see many options such as 'Move Buttons', 'Scale Buttons', 'Reset Layout' and if you scroll down a little bit you will see 'Enable Game Vibration.'

Note: The 'Enable Game Vibration' option lets the emulator send the game vibration data to your Android smartphone's vibration motor. You will get the same feeling of a PlayStation DualShock controller while playing games as your phone will vibrate when there's a collision within the game.
I have tested this feature with Tekken 3 and the vibration motor works great. For feeble attacks such as punch or kicks the motor vibrates feebly, but for super moves the motor vibrates with a strong feedback.
I do not recommend this feature to be turned on as it will drain your smartphone's battery. If you do have a original DualShock wireless controller (either from PS3, PS4 or PS5) then you can enable this option.
- Make sure 'Auto Rotate' is enabled on your phone and the app should be visible in 'Landscape Mode.' Now under 'Touchscreen' option tap the 'Move Buttons.'
- Once you tap the 'Move Buttons' option, a button layout editor will open. Here, you will see all the buttons on the screen. Touch any button on the screen and drag it anywhere as per your convenience.

- Repeat this process for all the buttons if necessary. Once you move the buttons as per your convenience, tap 'Edit Menu' and select 'Resize Buttons'. We will use this option to increase the size of buttons.

- Now the same editor will open but this time you can resize buttons. Simply tap on any button and drag slightly in upward right diagonal direction to increase size, drag in upward left diagonal direction to decrease button size.
- After configuring the button sizes, tap the 'Edit Menu' and select 'Exit Editor.' The game will start running and you will now see the buttons in the new configuration for size and layout.
Switching Between Analog and Digital Controller In Realtime
DuckStation Android Emulator offers an option to switch between analog and digital controller anytime during gameplay. Tap the circular button between the 'Select' and the 'Start' to switch between the analog and digital gamepad. This switch option is very helpful during gameplays you can use the digital D-pad or the analog as per your convenience.

Save and Load a PS1 Game State In DuckStation
Completing a PlayStation One game on your Android may not be possible in one go. In this case, you can save the game state and continue later from where you left. So, if you have completed nearly 50% of the game, you can save its state, load it, and later resume from where you left the game. Let's see how can we save and load a state in DuckStation for any PS1 game.
- When the game is running, tap the 'Pause' icon in the top right corner and then tap 'Save State.'

- Now select a 'Save State' slot and tap it to save the game state data in the slot.

- Once you tap the save slot, the game state will be saved immediately in the slot.
- To load the save state anytime simply repeat the 'Step 1' above by tapping the 'Pause' icon in the top right corner, tap 'Load State' and then tap the desired save slot to load the game state.


Note: A total of ten Save Slots are available to save your PS1 game states along with one 'Quick Save' slot (total eleven).
Setting Volume Up and Volume Down Buttons As Hotkeys To Load and Save a PS1 Game State
Every Android smartphone has at least two buttons: volume up and volume down. If you save a lot of game states and keep loading them then the traditional way of saving and loading a game state may not be right for you. In this case, you can set the volume up and the down button to quickly save and load a state with the press of a button.
Note: You can only set one save slot and one load slot with the physical volume up and down buttons on your phone. If you are setting volume down button for 'Save State 1' then you have to set volume up button for 'Load State 1' in order to load the same saved state.
Now, follow the steps below.
- When the game is running, tap the 'Pause' button an then tap the 'controller' button just next to the 'Settings' icon.

- Swipe towards left on the options menu and tap 'Hotkeys.' Swipe to scroll down and find 'Save Game State 1' and tap it.

- A popup will open asking you to register a physical hotkey for it. Press 'volume down button' to set as hotkey. Once you press the button, it will be saved as a save state hotkey and the popup will close. You can also see the hotkey name under 'Save Game State 1' as 's2mpu15-power-keys[2]/Button25' or similar.

- Now find 'Load Game State 1' and assign 'volume up button' in a similar way.
- Now, return to the game and press the 'volume down button', it should save your current game state. Press the 'volume up button' afterwards and it should load the same state.


Note: As you have set the volume buttons as hotkeys, you won't be able to use them for increasing or decreasing the game volume within the emulator app.
This only affects the behaviour of volume buttons within the DuckStation app and the volume buttons will work normally on your phone.
In this case you will need to minimize the emulator app and then use the volume buttons to increase or decrease the volume.
Unset Volume Buttons As Hotkeys
If you no longer want your volume buttons to be used as hotkeys for saving and loading states then you can unset them. Follow the steps below to make this happen.
- Simply, return to the 'Hotkeys' section and find 'Save Game State 1', tap it. A popup will open and then tap 'CLEAR' to unset the volume down button as the save state hotkey.
- You can follow the same step above to unset the volume up button as the load state hotkey.
DuckStation Setup: Connect PS3, PS4, PS5 Controllers or Keyboards to Play PS1 Games
Playing PS1 games on DuckStation with the touchscreen is not great fun. On screen controllers are good if you are gaming casually or on the go. But if you want to unlock the real experience of PS1 games on DuckStation, I suggest connecting either a PS3, PS4, PS5 controller, a wired or a wireless USB keyboard to play games.
PS3, PS4, PS5 and several wireless keyboards can be connected to your Android phone via Bluetooth. But for a wired or wireless USB keyboard you will need an USB-C OTG adapter or cable (USB-C male to USB-A female connector).
Note:PS3 controller doesn't support plug and play setup. So, even after connecting it to your Android phone via Bluetooth it may not work. In that case you can use an USB-C male to USB-A female OTG cable or adapter. PS4 and PS5 controllers won't have this compatibility issue.
- Connect your PS3, PS4, PS5 controller to your Android phone via Bluetooth. If PS3 controller doesn't work use an OTG adapter. If you are using a wired or wireless keyboard then you will also need an OTG adapter to connect them to your phone.
- After successful connection we now have to map physical buttons from PlayStation controller or USB keybaords in the DuckStation emulator app.
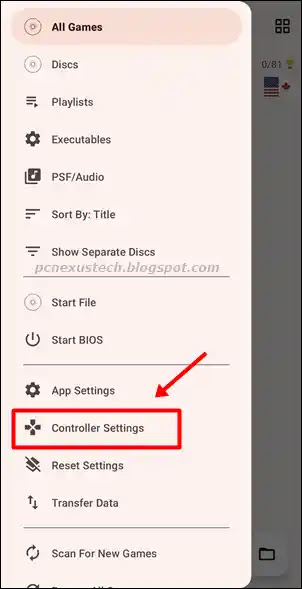
- Open DuckStation and tap the 'Menu' icon in the top left corner. Then select and tap 'Controller Settings.'

- Now in 'Controller Settings' page, swipe the options panel towards left and tap 'Port 1.'

- If you have connected a PlayStation controller then tap 'Perform Automatic Mapping.' A popup will open asking you to select the connected gamepad. This setting will automatically map all the physical buttons of your PlayStation controller in the emulator.

- Under the 'Bindings' section you can see the physical buttons data. This feature will work best with PS3, PS4, or a PS5 controller. But if you are using a generic gamepad then DuckStation may not map all the main buttons such the circle, triangle, square, cross, L1, L2, R1 and R2 buttons. In this case you have to manually assign the buttons.

- In the image below, you can see that the DuckStation app failed to map all the buttons of my generic gamepad and skipped the main buttons. In such a case, we have to map the buttons manually.

- Tap the 'Triangle' option in the app, a popup will open. Press the 'Triangle' button on your physical gamepad. On generic gamepads the triangle button is labelled as '1.'
- Similary, setup the remaining buttons: 'Circle ('2' on generic gamepads)', 'Cross ('3' on generic gamepads)', 'Square ('4' on generic gamepads)', 'Start' and 'Select.'
- Similarly, scroll down more and look for L1, L2, R1 and R2. Assign them accordingly if they are still unassigned.
- There is no need to setup 'Large Motor' and 'Small Motor' because they get automatically assigned. On my generic controller the motor feedback was working with DuckStation but the vibrations are feeble, may be due to power issues.


Warning: I do not recommend connecting a wired generic USB gamepad via OTG to your phone as it may damage your phone's battery by drawing high power.
I strongly suggest using a Bluetooth controller such from a PS4, PS5, XBox One or XBox 360 (a bit tricky to connect to Android). Bluetooth is very power efficient than the OTG cable setup and their is no risk of phone's battery damage because the Bluetooth gamepads use their own power source.
Connect a Second Controller For Two Player Configuration In DuckStation
PS1 Games like Tekken 3, Tekken 2, Street Fighter Alpha 3, Metal Slug X, Mortal Kombat 4 support two player gameplay. So, if you wish to play the games with your friends and sibling on your smartphone then you can setup an extra gamepad. Simply, follow the tutorial above with all the steps but this time instead of configuring 'Port 1', configure 'Port 2.' This way you can enjoy co-op and multiplayer fighting games on your Android smartphone with DuckStation emulator.
Note: Connecting two PlayStation controllers via Bluetooth to your phone will not be possible. Connect one controller using a USB cable (use USB-C OTG if needed) and connect the other one with Bluetooth.
Setting Up a Keyboard In DuckStation And Use It As a Gamepad
If you do not have wireless gamepads then you can use any USB keyboard (wired or wireless) as a gamepad. Because a keyboards has so many buttons, we can set the left side of the keyboard for 'Port 1' and right side of it as 'Port 2', so, two players can play using a single keyboard. All you have to do is to setup a physical keyboard buttons for all the main buttons in the emulator app. Use the tutorial above to configure the keyboard as a gamepad as the steps are pretty similar.
Before following the tutorial above, make sure you set the 'Controller Type' to 'Digital Controller (Gamepad)' for USB keyboard. If you do not change this setting the keyboard's arrow keys will work erroneously. You can find this setting under the 'Port 1' configuration settings. If you ever wish to connect a gamepad switch the setting back to 'Analog Controller (DualShock).'

Note: If you are setting up keyboard arrow keys as D-pad in DuckStation then you have to press the arrow keys twice to set them up while assigning in the emulator.
Start Playing Your Favorite PlayStation (PS1) Games On Android Now
I have covered the tutorial in detail, so you can now start playing your favorite PS1 games on your Android smartphone. You can use a wireless gamepad or a keyboard to enhance your gaming experience. But be careful about the ways to obtain a PS1 ROM and BIOS, as websites hosting such files aren't legal and may infect your device with malware and viruses. The tutorial only teaches a way to play Sony PSone games on Android and must not be treated as a source to endorse piracy. Enjoy!
 |
| Bloody Roar 2 PS1 Game on DuckStation |
 |
| Jackie Chan Stuntmaster |
 |
| Metal Slug X PS1 Android |
 |
| Tekken 3 on Android |
 |
| WWF SmackDown 2 Know Your Role |
FAQ: Frequently Asked Questions
Q1: Do I need PS1 BIOS for DuckStation?
Yes, DuckStation requires a valid PS1 BIOS file to work. Without it, the emulator won’t run any games. The SCPH1001.bin BIOS file provides essential system functions, ensuring proper compatibility, stability, and accuracy across all titles. Adding the official PS1 BIOS is mandatory.
Q2: Do I need to unzip ROMs for DuckStation?
DuckStation does not support running PS1 games directly from .zip or .rar archives. You need to extract them first into supported formats like .cue/.bin, .img, or .iso. Keeping them unzipped ensures compatibility and avoids crashes or loading errors.
Q3: Does DuckStation support PSX?
Yes, DuckStation fully supports PSX (PlayStation 1) games, since PSX is simply another name for the original PlayStation console. It runs most PS1 titles with high compatibility, enhanced graphics, save states, and controller support, making it one of the best PSX/PS1 emulators available today.
Thanks for reading this post. I’ve put in a lot of time and effort to bring you this detailed guide so you can enjoy the PS1 era without hassle. If you found it useful, please share it with your friends and family — your support keeps this work alive!❤️


No comments:
Post a Comment